Javascript Linting with ESLint
![]()
Javascript Linting with ESLint
Hello, in this article I'm going to explain what linting is, and why I am doing that and how to do it.
What linting is
A linter is a static code analysis tool that often flags your code about:
- out of the/your code standards
- misusages of language features that are obsolete or harmful
- misusages of programming in general
- or non-consistent structure of code
Why is this a big deal?
Scripting languages like Javascript have no compiler to pre-check some rules and errors, so everything will be come out when the code runs (runtime). Even the smallest mistakes like forgetting a semicolon on a certain case, leads to tremendous bugs that may require hours of debugging and cause pain.
Also in a multi developer organization, you often create some rules for consistency (code standards) to increase code readability and maintainability.
In Javascript there are lots of features in the language but some of them should be avoided as in this article of Douglas Crockford's list.
What about indentation? Some editors displays tabs as 2 spaces and some displays 4 spaces. And if spaces and tabs are used together in a file, on different editors code indentation may be different or scrambled.
History of linting in JavaScript and comparison of linters
I think this article in Sitepoint would explain better than I because I simply not used all of the linters and choose to use recommended linter: ESLint, from that article itself.
ESLint
ESLint is my choice because it supports React's JSX format and ES6 features. It's written in JavaScript on Node.js.
It is highly configurable, it has a pluggin system that you can use additional rules other than provided built-in ones.
How to install?
You can install ESLint via npm but there are two options you can take: installing globally or locally.
I chose to install my ESLint locally because I just want all of my dependencies in my packages.json file.
 1...
 2  "devDependencies": {
 3    "babel-core": "^6.4.5",
 4    "babel-eslint": "^4.1.6",
 5    "babel-loader": "^6.2.1",
 6    "babel-polyfill": "^6.3.14",
 7    "babel-preset-es2015": "^6.3.13",
 8    "babel-preset-react": "^6.3.13",
 9    "babel-preset-stage-0": "^6.3.13",
10    "babel-runtime": "^6.3.19",
11    "eslint": "^1.10.3",
12    "eslint-config-airbnb": "^4.0.0",
13    "eslint-friendly-formatter": "^1.2.2",
14    "eslint-loader": "^1.2.0",
15    "eslint-plugin-react": "^3.15.0",
16    "webpack": "^1.12.11"
17  }
18...
After writing that to packages.json you can install these (or some of them) via npm install.
The reason there are so much devDependencies is I'm using webpack (https://webpack.github.io/) and babel (http://babeljs.io/) together for bundling and transpiling my code. Fortunately I can also use babel for ESLint to support ES6/ES7 syntax.
Here is my babel configuration .babelrc:
1{
2  "presets": ["es2015", "stage-0", "react"],
3  "plugins": ["transform-runtime", "transform-async-to-generator"]
4}
I can now use React JSX transpiler and ES6 features also some of the ES7 features. You can use pre-defined plugin presets and/or define plugins yourself. For all ES6 features see my article.
I also used Webpack for polyfilling Promise (Turkish) with a library knows as bluebird. So whenever I use Promise, it will be called from bluebird.
How to use?
Here is my .eslintignore file:
1build/
2node_modules/
I tell ESLint to ignore these folders, because I don't want 3rd party libraries and my minified build scripts to be linted.
Now you have two (or three) options:
- Write a .eslintrc configuration file for your needs
- Use
./node_modules/eslint/bin/eslint.js --initcommand- And take the questions ESLint to create configuration file for you
- Or choose to use one of the default configurations (Google, Airbnb, Standard): extend
The simplest move would be to select a pre-configuration but reading and thinking about each rules one by one might increase knowledge and maybe you want to take a different path apart from pre-configurations provided as your needs though you can override any rule at any time.
And I highly recommend you to read Airbnb's Javascript styleguide and visit every rule in the ESLint documentation.
Configuration
Configuration could be one of these forms:
- Javascript file (which you should export with
modules.export) - JSON file
- YAML file
eslintConfignode on package.json
Please see the documentation about cascading to make sophisticated configurations.
Also you could use command line with parameters.
Main nodes of configuration:
- extends which you can use for sharable settings as node modules. These settings are overridable.
- parser which I chose
babel-eslintmodule for ES6 support - env for choosing different environments like
browserornode - globals for specifying your global variables
- plugins which I use
reactto use theeslint-plugin-reactwith it - ecmaFeutures which you should specify features you want to use even you select another parser like babel
- and the rules
Rules configuration
As I said before, you can override any pre-configuration, by defining the same rule with different parameters/configuration.
First parameters could be a number from 0 to 2:
- 0 - Turn the rule off
- 1 - Turn the rule on as a warning
- 2 - Turn the rule on as an error
Here is a screenshot from eslint command:
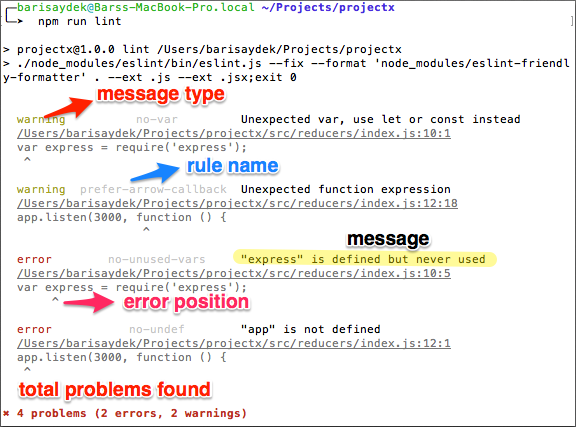
If you choose 1, ESLint only prints a warning message, but choosing 2 makes ESLint to return exit 1 which will break your build script/tool.
In addition you can use an array to define additional parameters on that rule i.e:
Using with default settings as error
1"brace-style": 2
Using with given settings as error
1"brace-style": [2, "1tbs", { "allowSingleLine": false }]
Running
From your terminal run this command:
1./node_modules/eslint/bin/eslint.js --fix --format 'node_modules/eslint-friendly-formatter' . --ext .js --ext .jsx
I used a different formatter eslint-friendly-formatter, for .js and .jsx files using --ext and . to recursive linting. You can use --fix parameter to let ESLint fixing simple mistakes. (Rules can be fixed are marked with a tool icon in documentation)
I also added these scripts to my package.json:
1...
2  "scripts": {
3    "start": "./node_modules/eslint/bin/eslint.js --format 'node_modules/eslint-friendly-formatter' . --ext .js --ext .jsx && webpack && webpack-dev-server",
4    "lint": "./node_modules/eslint/bin/eslint.js --fix --format 'node_modules/eslint-friendly-formatter' . --ext .js --ext .jsx;exit 0"
5  },
6...
I want my build to be broken so I added to my start script and npm run start will also run ESLint. npm run lint will also run ESLint but this time I gave --fix parameter to it and added exit 0 for npm not to display JavaScript error.
Integrations
You can even use ESLint in your favourite editor (like I do with Atom with same configuration): http://eslint.org/docs/user-guide/integrations.html
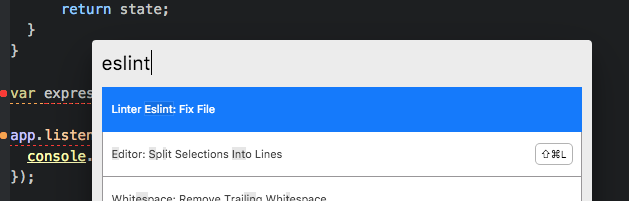
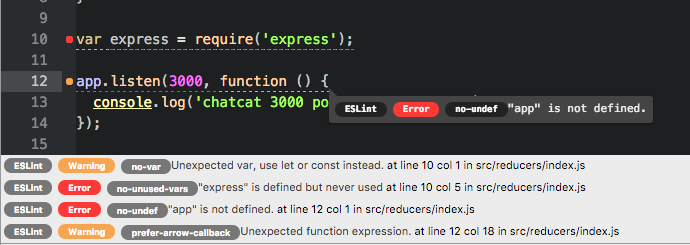
Here is the same code screenshot from atom eslint plugin:
And you can auto-fix some of the rules (ones with the tool icon) by typing
⌘ ⇧ P(or whatever shortcut for your OS) for the Command Palette andeslint. Then select the one with thefixcommand. You can add a shortcut for this if you want, too.